Professor Norm Matloff
Dept. of Computer Science
University of California at Davis
Davis, CA 95616
To skip the overview and go right to the full, worked-out example, go here.
Disclaimer: What I've written here is, alas, all I know about Beamer. If you have a question on Beamer which isn't answered here, you will find other sources much more useful, such as the TeX/LaTeX Usenet newsgroup.
Beamer allows you to create slides featuring overlays, animation and so on in LaTeX. You simply insert some calls to Beamer macros in your LaTeX source file, then run pdflatex. You then use Acroread (or xpdf etc.) to present your slides.
For LaTeX users, Beamer has a number of advantages over PowerPoint or OpenOffice:
Another excellent LaTeX presentation-making package is Prosper package. Each package has certain advantages over the other. The advantages of Beamer over Prosper are:
This document is intended as a quick tutorial on using Beamer. It's certainly enough to get you started, and the features presented here may be all you ever need. However, after you get comfortable with these features, there are tons of other ones which Beamer offers--its user manual is 210 pages long! Here are some other Beamer tutorials on the Web:
Contents of this site:
You should first take my 5-minute tour. First view the result, at http://heather.cs.ucdavis.edu/~matloff/BeamerTour.pdf. The raw LaTeX file is here. View the PDF file, page by page so you can see the overlay action etc., then compare what you see in PDF to the raw .tex file.
Your Web browser is probably configured to use Acroread on PDF files. If so, you can go from slide to slide using PageDown and PageUp (or the arrow keys). You can go to full screen via ctrl-L, and later toggle to get out of full screen mode. If on the other hand you are using xpdf, again use PageDown and PageUp for navigation. But if you want full screen mode in xpdf, you need to specify the -fullscreen option on the command line. Note that Beamer itself includes little navigation icons at the bottom right of the screen.
Then download the source, at http://heather.cs.ucdavis.edu/~matloff/BeamerTour.tex; you'll need the image too, if you want to actually run pdflatex on the source. Glance through the source, and compare to the PDF output. I have placed explanatory comments by most of the Beamer commands, and will explain many of them in more detail below.
If you are using Ubuntu, just type
sudo apt-get install latex-beamer
Otherwise:
Obtain from the Beamer home page, https://bitbucket.org/rivanvx/beamer/wiki/Home.
You'll also need LaTeX, of course. You'll also need (from the Beamer home page):
Assuming you have root access to that directory (see below if not) create subdirectories beamer, pgf and xcolor. Install the corresponding packages in those subdirectories, so that for example you will now have a further subdirectory /usr/share/texmf/tex/latex/beamer/base, a file /usr/share/texmf/tex/latex/pgf/pgfautomata.sty
Then run texhash to update LaTeX's database.
If you do not have root access, you can install in another directory, say /u/v. However, you'll then have to set your TEXINPUTS environment variable. For example, in the C-shell, you'd type
setenv TEXINPUTS .:/u/v/:
In the pgf case, I found that version 0.95 had a multi-level directory structure, unlike the earlier versions, and that Beamer was unable to find the files without further arrangement. The approach I took to solving this problem was to "flatten" the structure, which I did by writing the following Unix C-shell alias:
alias flatcopy "find . -name '*' -type f -exec cp {} \!* \;"
I then ran
flatcopy /usr/share/texmf/tex/latex/pgf
Finally, I had to update the LaTeX database, by running
texhash
The meat of the presentation consists of the frames. One frame corresponds to one or more overlaid slides. If for instance you have three slides overlaid with each other, that will correspond to just one \begin{frame}...\end{frame} pair.
The document as a while will look like this:
\documentclass{beamer}
\mode<presentation>{theme info etc.}
regular LaTeX title/author info
\AtBeginSection[]{} % for optional outline or other recurrent slide
\begin{document}
optional title frame
frame
frame
...
frame
\end{document}
This used to set various global parameters, such as visual themes. As a nice starter mode section, I recommend
\mode<presentation>
{ \usetheme{boxes} }
The structure of a frame is
\begin{frame}
\frametitle{title you choose}
text you choose, i.e. body of the frame
\end{frame}
The frame title that you choose will show up at the top edge of the frame. You can also choose a subtitle.
Beamer has a very rich selection of methods for creating overlays. Here we introduce the most primitive types.
The simplest way to create a set of overlaid slides is to use \pause everywhere you want a break between overlays. For example,
\begin{frame}
   \frametitle{Overlay Example}
   Here is a list of items:

   \begin{itemize}
   \item first item
   \pause
   \item second item
   \pause
   \item third item
   \pause
   \end{itemize}
would create a frame consisting of three overlaid slides. At first only "Here is a list of items:" and "first item" would appear. Then "second item" would surface, etc.
For this reason, one can also itemize within itemizing, etc.
There is nothing special about \itemize here. The \pause command will create an overlay wherever we place it. So for instance
\begin{frame}
   \frametitle{Overlay Example}
   Here is a
   \pause
   list of items:
   \pause

   \begin{itemize}
   \item first item
   \pause
   \item second item
   \pause
   \item third item
   \pause
   \end{itemize}
would first display only "Here is a". Then "list of items:" would appear and so on.
A much more flexible way to create overlays is to use \uncover. For instance
\uncover<3->{The dog jumped the fence.}
would display that sentence in the third and all subsequent slides in the current frame.
If you always want to pause after items, place the command
\beamerdefaultoverlayspecification{<+->}
after your \begin{document} command.
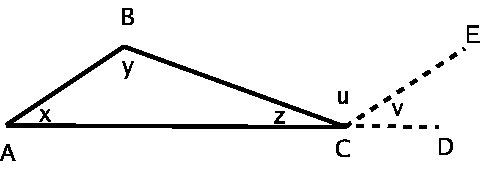
To see a more meaningful example, take a look at the source file in my quick Beamer tour cited above. There I used \uncover in LaTeX's \tabular environment to show the steps in a geometry proof, one step at a time.
All the usual LaTeX \title, \author etc. information declared earlier in the document will now show up in a slide, if you include this paragraph:
\begin{frame}
\titlepage
\end{frame}
One may wish to have a certain slide show up repeatedly within the presentation. One common example of this is a highlighted outline:
A popular way of organizing a slide presentation is to have an outline slide, which will appear repeatedly at various times during the presentation. The slide consists of an outline of the talk, listing the major topics. Each time the slide appears, it highlights the title of the section of the presentation which will next be shown. This way the audience can see the "forest" instead of the "trees," i.e. understand how the parts of the talk fit together.
Beamer allows us to automate this process.
One creates the groundwork for an outline in Beamer by using ordinary LaTeX \section, \subsection etc. These will be used to tell Beamer the points in the presentation at which to insert the outline or other kind of recurrent slide. We arrange this as follows, in the outline case:
\AtBeginSection[]
{
   \begin{frame}
       \frametitle{Outline}
       \tableofcontents[currentsection]
   \end{frame}
}
This tells Beamer, "At each point which we've marked with a LaTeX \section command, insert a Beamer frame whose title at the top edge of the slide is `Outline' and which consists of our LaTeX table of contents with the current section being highlighted." (Note: Remember that you may have to run pdflatex more than once in order to get the table of contents.)
If we need to do this instead at the subsection level, we would have
\AtBeginSubsection[]
{
   \begin{frame}
       \frametitle{Outline}
       \tableofcontents[currentsection,currentsubsection]
   \end{frame}
}
Of course, we can set whatever frame title we wish, not just `Outline'. And it's clear that we have can recurrent slides other than outlines, by simply replacing the \tableofcontents command with other text, say a joke we want to keep repeating until people get sick of it. :-)
You can use the traditional \verbatim, or probably better, the listings package.
If you use \verbatim or lstlisting within a frame, be sure to declare the frame fragile:
\begin{frame}[fragile]
You may also need the relsize package:
\usepackage{relsize}
To use listings, place
\usepackage{listings}
near the top of your source file. The simplest usage is
\begin{lstlisting}
place your code here
\end{lstlisting}
See the listings manual for all the other tricks that can be done.